After posting photos of the Choc Mint Slice I baked yesterday I had quite a few of you asking for the recipe so, here it is.
I will try to get a few more recipes up when I get the chance. I tell you, this crew is too well fed so I don’t seem to get a whole lot of spare time.
Now, a lot of my recipes are thanks to our old cook – Aileen. Oh she is a top bird. Aileen was with us from 2009 – 2014 and boy were we lucky to have her. Not only was she low maintenance but she taught me a lot about how to run a kitchen and keep on top of everything. I didn’t ever have to go over and ask her to do things differently or clean the kitchen up, it was always spotless. In fact I find it hard to keep the kitchen “Aileen Clean”.
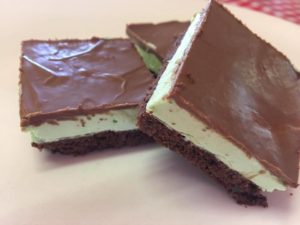
This Choc Mint Slice recipe was one of my favourites. If it was in the fridge I knew I was in trouble, I just couldn’t stay away. The mint centre is just so creamy and smooth. Oh god it is good. So what are you waiting for…. run don’t walk and get that oven pre-heated, here it is…
Print
Aileen’s Choc Mint Slice
Ingredients
Base:
2/3 cup brown sugar (firmly packed)
1/3 cup plain flour
1/3 cup self raising flour
2 tablespoons cocoa powder
75g butter (melted and cooled)
1 egg (lightly beaten)
Centre:
175g butter (room temp)
3/4 cup icing sugar
1 1/2 teaspoons gelatine powder
1/3 cup boiling water
1/2 teaspoon peppermint essence
Green food colouring
Topping:
200g choc bits
2 teaspoons oil
Instructions
Line & grease a slice pan (18 x 28cm) with baking paper.
Place sugar, flours & cocoa in a large bowl. Make a well in the centre and add the butter and egg, stir to combine.
Press over base of prepared pan and smooth (I use my fingers for this, it is sticky and might feel like there isn’t enough but just keep pushing it out with your fingers).
Cook in a moderate (180 deg C) oven for about 15 mins.
Cool in pan.
Beat butter and sugar until light and fluffy.
Meanwhile, sprinkle gelatine over the boiling water and stir until dissolved.
While motor operating add the gelatine/water to the mixture and beat until thick and creamy.
Beat in essence and food colouring.
Spread evenly over cooled base.
Place chocolate and oil in a bowl over a pot with simmering water.
Stir until melted and smooth.
Remove and cool for 5 mins.
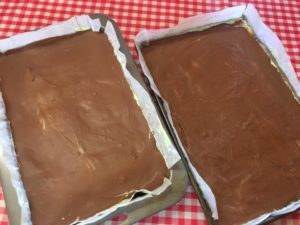
Spread over filling and stand at room temperature until set.
Cut into squares.
Now, a few tips. Yesterday was only the second time I have made this, so I am certainly no expert but I did make a few mistakes the first time.
Make sure you let the base cool. When you put the creamy centre on don’t be tempted to put it in the fridge like I did, just leave it on the bench. Then when you melt the chocolate make sure you definitely leave it to stand for 5 mins (don’t worry it won’t go hard). When you put the choc on, again – don’t be tempted to put it in the fridge, leave it to set on the bench. It think this ensures it all melds together properly.
When I first made it I kept putting it in the fridge thinking there was no way the melted choc could just go straight over that creamy centre, but then in the end the choc just lifted straight off, it still tasted good but the choc didn’t stick to the cream.
Happy baking, let me know how you go and share your photos with us over on Facebook or instagram #aileenschocslice
Thanks Aileen, you rock – and aren’t too bad at all for an old girl! xxx
Aileen sounds like such a legend, and you are too! Coming from someone who shops daily, I couldn’t plan a week in advance! This looks a bit tricky, but must try it. Thanks for the tips!
Living in Mount Isa, it will have to go in the fridge at some time, or the filling will stay liquified in this heat!!!
Definitely in the fridge Jude, ha ha ha
P.S. A friend posted this recipe on her facebook page “My Outback Kitchen and Garden”. I was curious, as my sister’s name was Aileen and had to come and have a look. I have since followed a few links and read your “About” page and will read your blog as and when I get the time… You sound like a wonderful lady!
Hi Jude and thanks for your messages! Hope you enjoy the blog. I will have to check out your friends facebook page. Hope you enjoy the slice. It is so good.